We’d only just met, but somehow McGee could tell I was the overly ambitious, critical, and overthinking type. As a paddled back after (another) failed attempt, he told me “Get out of your head.” And he was right. My fear of falling off the board was literally making me fall off the board. In that moment, McGee felt like more than just a surf instructor and closer to a life coach. His words could easily be applied to so many areas in my life. I just had to get out of my head.
Trying surfing for the first time
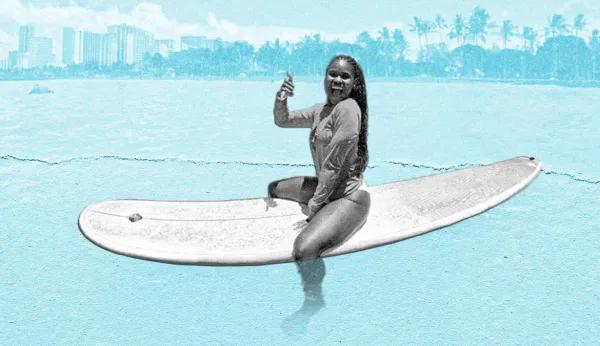
Before an end-of-summer family vacation to Hawaii, I had never surfed a day in my life. I had also never even dreamed of trying the sport until the trip was planned. There aren’t a ton of black female surfers to model after (at least none I’d heard of or seen before), so it’s never been an activity I saw myself doing. But I’ve always been drawn to new experiences, and you can count me in for basically anything that has to do with fitness. I got my first chance during a week at Waikiki and becoming one with the water and waves.
I’m not particularly the strongest swimmer. I know a few basics for survival—treading water, doggy paddle, and I can float on my back…so basically, I know how to not drown! But swimming “athletically” and efficiently isn’t my strong suit. But I’m a six-time marathoner, personal trainer, running coach, indoor cycling instructor, and I dabble in yoga—there’s got to be some athletic capabilities that are transferable, right?
Surfers look so cool, confident, and strong. In my head, I felt like I could replicate that.
My inexperience (and teetering confidence) with water sports wasn’t stopping me from the challenge. Surfers look so cool, confident, and strong. In my head, I felt like I could replicate that in some way. I am a Virgo, after all! Trying new things and learning to master them is kinda my thing. Plus, research shows that new experiences are good for our emotional health, according to UW Medicine. They can gives us a hit of dopamine (those feel-good chemicals) and give us a sense of satisfaction. So I knew it would be hard—but I also knew that if I could pull it off, it would be worth it.
Surf’s up at surfing school
Anytime you want to try something kind of scary for the first time, it’s best to set yourself up for success. So for surfing, the first step was finding the perfect place to take a lesson. On Oahu there are plenty, but finding the right fig was important to me: I’m a pretty hands-on learner, so I was looking for an instructor that would be patient with me and happily answer the wave of questions I knew I’d have. During my first day in Hawaii, I went for a run and ran past a bright, eye-catching yellow school bus that was labeled “surf school bus.” Yes, please. I wanted to know which surfing school on Waikiki was going to bring me back to the days of boarding a yellow school bus (I loved the nostalgia!).
Turns out it was the Ohana Surf Project—an organization that prides themselves on having a “family-oriented approach” and aims to improve the lives of others, just like family. I was sold. I booked a two-hour private lesson for the following day (my birthday) and packed up the essentials: bathing suit, towel, and a good attitude for a day of trying something new, with the very high possibility of failing.
I arrived at the Ohana Surf Project homebase 15 minutes before the start of my lesson. I was given a long-sleeve shirt to throw on top of my bikini and some water shoes to protect my feet from rocks and the reef on the ocean floor. A group of us sat down for a quick orientation and water safety presentation. Turns out, you don’t have to be a strong swimmer to surf (per one of the instructors), and I was elated. Things you do need: balance, upper-body strength, and an aloha attitude. Then we loaded on the surf school bus to head to the beach.
The water on Waikiki beach is so beautiful it looks fake. Crystal clear blue, white sand, and soft waves crashing in the Pacific Ocean…a total dream. I couldn’t wait to jump in. But first, it was time to meet the man that was going to make my surfing dreams come true.
Meet my coach, Kainoa McGee
After hopping off the bus I was introduced to Kainoa McGee. Born and raised in Hawaii, McGee has been a surf instructor and competitor for more than a decade. I could tell he knew what he was doing: McGee just has that look, like yeah, that man can dominate some waves.

When he was assigned to me, another instructor leaned over and said, “You’re in good hands,” and my teetering confidence felt a little stronger. McGee gave me a warm, friendly greeting and we walked over to a shady spot in the grass before heading to the water. The first thing we did was a few exercises to activate our surfing muscles. Warming up? Now this is something I know how to do! We did arm circles to wake up our arms and shoulders (essential muscle groups to paddle) and twisting lunges to get the legs and core ready to go.
From there it was time to practice my surfing stance. I laid in the grass pretending there was a surfboard under me, and McGee instructed me how to lift up into a standing position. It’s almost like a burpee, with a few modifications. Your hands stay close to your chest, squeezing your core, then you pop up, parallel with the board, with your feet wide and knees slightly bent. On land, I was nailing it! But could I replicate it in the water?
On land, I was nailing it! But could I replicate it in the water?
McGee and I each picked up one end of a surfboard and carried it to the edge of the ocean. It was finally time for me to be put to the test—and the only options were to surf, swim, or sink. I was buzzing with excitement and nerves. We waded in and immediately got crashed by a wave. I didn’t even get a chance to ease into the water and feel out the temperature, but I took it as a sign that it was time to dive in. It was a hot and sunny day; the water felt cool and refreshing. I climbed onto the surfboard and paddled into the water.
More lessons than just surfing
As expected, the first few attempts to get up on the board were a total fail. McGee would give me a big push when a wave was coming, so I didn’t have to paddle too hard. Then I’d try to do what we practiced on land—push up and bring my right leg to the front of the board, stand parallel and balanced. Easier said than done.
The water felt good, but I was determined to get up on that board. Thirty minutes into my lesson, as I paddled back to McGee for another try, he spoke the words to me that I’ll never forget: You’re an athlete. You can do this. Get out of your head.
Get out of your head.
The next wave came rushing toward us and he gave me a push. The sound of water whooshing under my board rang in my ears. It felt like I was floating. Then I heard McGee yell, “Up!” I carefully lifted my chest, swung my leg forward, and stood up.
I was surfing!
I rode my first wave all the way. I could hear McGee and the instructors cheering for me. The feeling was enthralling, and from that first wave to the end of my session, I was catching waves and taking names.

Imposter syndrome hit me in waves, too
After my private lesson I felt encouraged to keep practicing. Plus, there were plenty of surf shops that offered board rentals. I found the closest shop to my Airbnb and walked in with the intention of picking out a board for the day. Immediately the vibes felt off. The two men working in the shop didn’t acknowledge I walked in or as I browsed the shop’s gear. Finally I asked how much it cost to rent a board. The employee looked me up and down and said, “Have you ever even surfed before?”
I was shocked. That didn’t answer my question, and what exactly does a surfer “look like,” anyway? I told him yes, I have surfed before. Then he tried pushing me into buying a surfing lessons package, instead of answering my original question. After explaining to him that I’d taken a private lesson earlier in the week, he dismissively said, “Oh. Well I guess you can rent one,” before walking away.
There was no way I was giving them business. I walked out of the surf shop pretty discouraged. Did I belong in this space? Am I in over my head to get out there and try on my own? I felt imposter syndrome taking over and headed back to the Airbnb.
Did I belong in this space? Am I in over my head to get out there and try on my own?
I told my mom about the exchange, and naturally, she went into outraged mom mode. “You’re getting back in that water! You’re a surfer!” she exclaimed. She made it her personal mission to help me find another surf shop that was more welcoming. After a short walk, we stumbled upon a board rental stand at Billabong.
A woman at the front desk greeted us with a friendly smile. I explained to her that I was a beginner, but hoping to rent a board so I could keep practicing. She chatted with me for 20 minutes to explain which board would be the best fit, previewed wave conditions with me, and encouraged me to get out in the water early so I could have a good session. This was the kind of interaction I needed.
Catching waves and building confidence
For the rest of my trip, I rented a surfboard from the Billabong stand. Taking her advice, I woke up around 8 a.m. to eat some breakfast then get out into the water where the more experienced surfers gathered. I made sure to stay out of the way as I watched their technique—the way they paddled, positioned themselves to waves, and so seamlessly got up onto their surfboards.
After “studying” for 30 minutes, I felt ready to catch my own waves solo. There was no push from McGee, but I could hear him saying, “Get out of your head. You’ve been doing this your whole life.”
When a wave came, I paddled hard. I listened for that whooshing sound, and that feeling of water surging beneath my board. I carefully lifted my body, standing up on my surfboard and holding the position. I was doing it.
I rode the wave until it died and my board became still. Plopping back down, I could hear a round of applause from some beach-goers on the sand. Take that, surf shop guy. I am a surfer.
Hip Abduction Exercises Are the Secret to a Strong, Pain-Free Lower Body. Try These 5 Moves

Photo: Getty Images/ South_agency